Sunday, January 31, 2010

Blogaversary and blog candy!


I thought it was going on one year but I can't believe it's been two years since I've started my blog!! With a full-time job I may not always get to make projects or post as much as I'd like but I think I've done a pretty good job. I just checked my stats: it was two years ago on this date when I started blogging; I have 100 posts and I have over 3,000 hits!

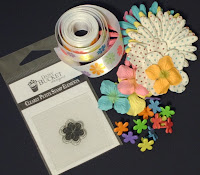
To celebrate these milestones, I am offering 3 sets of candy! (two studio g clear stamps, Paper Crafts sticker sheet, Memento potter's clay ink) (Daisy Bucket petite stamp-dahlia small, Prima flowers, brads, ribbon) (Stampendous stamp set-Hey there Cupcake, Dawn Bibby Designs outline specialty stickers-general sentiments)

Leave me a comment by midnight EST on February 13 telling me the types of crafts you like to make and I'll select 3 people to win! I will post the winners on February 14!

Friday, January 22, 2010

With Deepest Sympathy


A clean and simple sympathy card I made last night to send to a coworker. I used a stamp by Hero Arts called CardArt Happy Wishes. I masked out the sentiment(this obviously didn't fit the theme of the card) and the butterfly because I only wanted to use the floral silhouette image. The sentiment is a stamp by Rubber Stampede. I used Gina K. Designs pure luxury white for the card base and I stamped the images using Stampin Up's So Saffron ink.

Saturday, January 16, 2010

Color and Sketch challenges


Here are a few projects I created for two of the Gina K. Designs January release party challenges over at Splitcoaststampers. All stamped images are from Gina K. Designs.

The sketch challenge was to make a scrapbook page and I try to participate in these when I can because it helps me get those pictures of out of storage and on display. I used images from Guiding Light and Flowers for Daisy stamp sets. I embossed the birds and Psalms verse in white but I used Versamark ink to stamp the bird on the wood log (in the bottom right corner) for a subtle look. I used a white gelly roll pen by Sakura to write the title and journaling. I also added a few sea shells I cut with a Cuttlebug die at the bottom for a bit of embellishing.

I made the card for the color challenge; make a Valentine's card with no pink or red. This was a quick and simple card to make. I embosssed the card front with the Cuttlebug swiss dots embossing folder, I cut the hearts using a Sizzlits die and I stamped the sentiment using words in the Say it with Flowers stamp set.

Sunday, January 3, 2010

An anniversary and blog hop


Melanie Muenchinger is celebrating her two year anniversary of illustrating for Gina K. Designs and blogging! Melanie has designed 25 stamp sets within these two years! I own several of her sets so I'm joining in the celebration with this card. I was inspired by an Asian floral arrangement I saw in a book which lead me to this design to showcase these daisies. The flower images are from the A Year of Flowers set and the sentiment is from the Say it with Flowers set. I colored the daisies with Prismacolor pencil numbers 915, 929,942,1002. I cut each petal and curled them and adhered to the card stock base with dimensionals. I double stamped the stem image to make them longer to extend from the vase. I colored them and the leaves with Prismacolor pencil numbers 911 and 1005 before cutting them out and adhering to the card base. I used a paper cutter and corner rounder to make the vase. The sentiment panels were cut with Nestabilities die cuts. I finished off the focal panel with machine stitching. To check out the blog hop, go to Melanie's blog here. If you own any of Melanie's stamp sets, create a project and join in the blog hop!

Friday, January 1, 2010

Tiled blessings


On StampTV this week, there is a technique challenge to create your own Italian tile.

To create my tiles for the focal image, I cut a square of cream card stock and stamped the veining image (not sure what it's called) from the Bold Flowers stamp set over the whole piece using VersaFine vintage sepia ink. Then I sponged on these Distress Ink colors: fired brick, walnut stain, spiced marmalade and faded jeans before stamping the flower image three times using the fired brick ink, from the Elegant Flowers stamp set. The next step I did was to use my paper cutter to make my tiles by scoring the paper at every 1/2 inch. I then used my nestabilities die to cut the plain and scalloped oval shapes. I created the background panel beneath the ovals using more cream card stock and the Cuttlebug tiny mosaic embossing folder. I used the debossed side and inked it up using the same Distress ink colors. On the sentiment panel, I scored the squares to keep with theme of tiles and I used a sentiment from the Say it with Flowers stamp set. I completed the card with some ribbon from the Stamp TV floral frenzy embellishment pack and rounding off the corners of the card.