Sunday, February 8, 2015
New Year, new blog
With the start of a new year, I have decided to start a new blog. If you're interested in my craft happenings, information can be found at Bouquet of Crafts! Thanks!

Sunday, October 12, 2014
project - Online Card Class Day 8
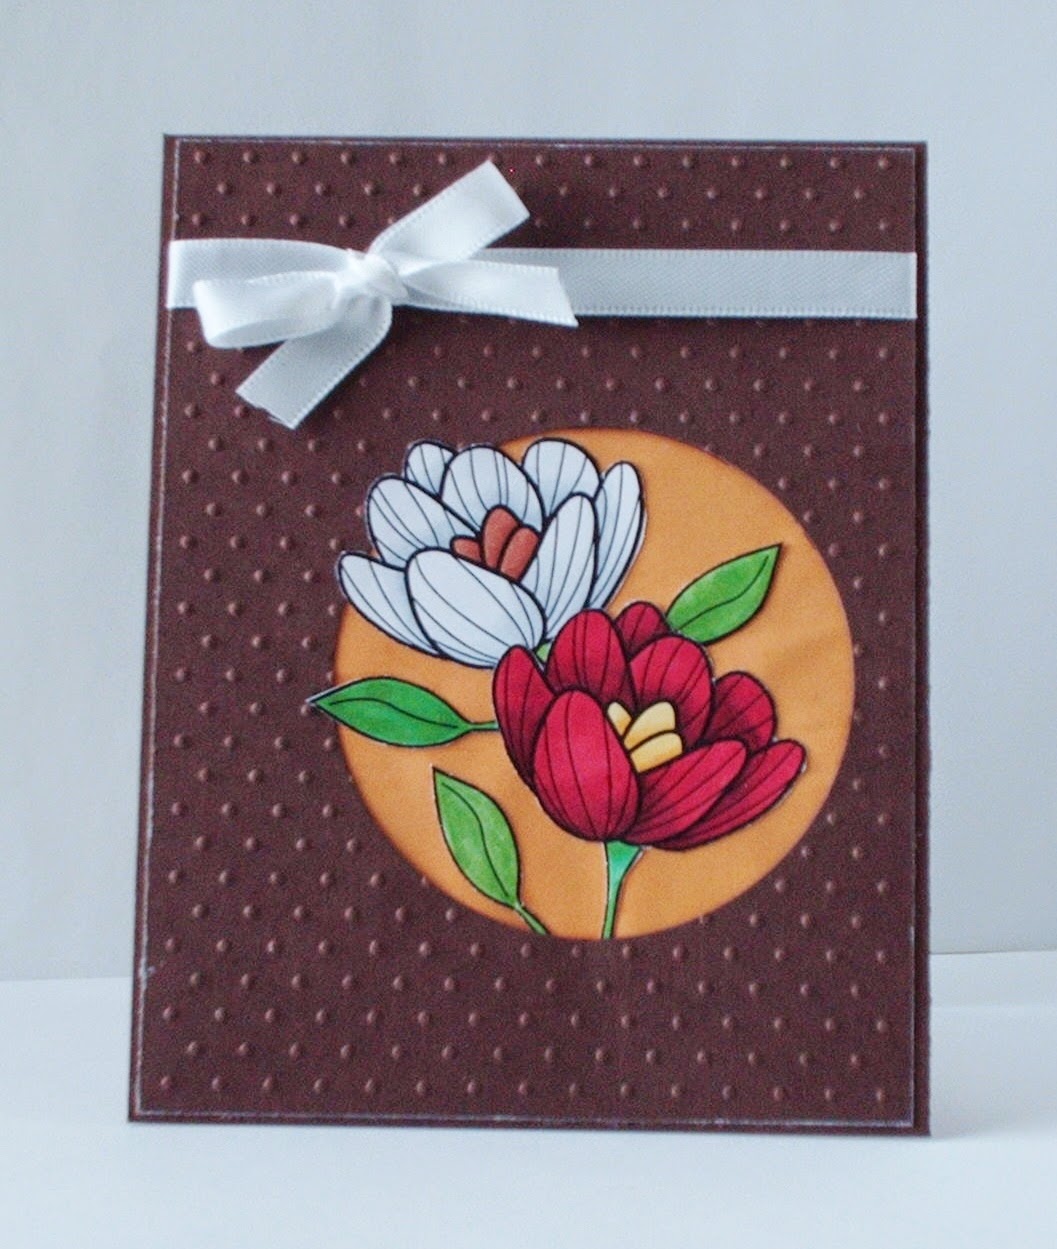
Now that the basics have been taught, the Online Card Classes Copic Markers for Card Makers, day 8, is to incorporate practice images into a card. I was inspired by Sandy's "Beautiful" card and decided to use a few of the flowers that I colored. The card base is dark chocolate card stock by Papertrey Ink. The added front panel layer, also with the same card stock, was dry embossed with swiss dots, swiped with white ink along the edges and top wrapped with a ribbon and bow. I also decorated the interior to show off a full bloom and to also add a panel for writing.

Saturday, October 11, 2014
Online card classes Day 7
The topic for day 7 of the Online Card Classes Copic Markers for Card Makers was coloring with difficult colors. The colors used in the lesson were red, white and black. The images for the lesson was a flower and robot vampire and bat. I have a Copic R29 which is the only red I own in the R2 color family. On the first flower, I combined R29 with R85 which looks a bit of a pinkish red and R89 which is more of a deeper maroon color. I put down a base color of R85 and then R89 for the shaded area. To try to make the petals red, I tried the tip to tip technique to blend the R89 with the R29. Because of the different intensity of these colors, it didn't quite work although not too bad but I do need to practice the technique more to get better blending. The second flower I used R29 and R89 and it looks fairly good. The third and fourth flowers I colored with C1, C3 (cool gray colors) and a bit of the colorless blender to create a white flowers. It may be hard to see in the photo but the difference can be seen in person. Also, the lesson included a robot vampire and bat image. The instructor used darker grays and black for the cape but I only have the C1 and C3 so I experimented with what I had and used the R89 for the interior and black on the exterior. I like the look. I also tried to give the cape on the second robot a pleated look similar to what the instructor demonstrated. Again, I didn't have any darker grays so I used the R89 for the pleat. And for the bats, I used the grays and outlined them with the black. However, on the first bat, I tried to incorporate some black into the wing by trying the tip to tip technique with the C3 and the black and also the colorless blender and black. Well, if I had worked on it more, I might have gotten the wings a little more color. But overall, it wasn't too bad practicing with these colors. Below is my practice sheet.

Thursday, October 9, 2014
Online Card Classes day 6
Using the colorless blender, coloring animals and adding texture were the topics for Day 6 of the Online Card Classes Copic Markers for Card Makers . On the first dog, I did some basic coloring and added some spots. For the second dog, I used the colorless blender to create texture by dabbing the marker over various parts of the image which created the white spots. The coloring of the orange dog was basic however I used the colorless blender to fade the color down into the white areas. And on the fox image, I did my best at trying to make long fur but I need to practice getting thinner strokes to make finer lines. A picture of the practice sheet of colored images is below.

Online Card Classes practice day 5
The lesson for day 5 of the Online Card Classes Copic Markers for Card Makers was about coloring hair, skin and clothing. It was fun learning various techniques from the teachers but it will sure take some practice. Coloring the hair was a bit rough but with more practice I should get better with the shading and highlights. The skin coloring wasn't bad at all and it was fun coloring the cute ballerina image! Below are the pictures of my colored images for this lesson.


Sunday, October 5, 2014
Online Card Classes practice day 4
For day 4 of the Online Card Classes Copic Markers for Card Makers, the lesson was about lighting and how to shade an image depending on the direction of the light source. Lighting and shading is not something I have given much thought to when it comes to coloring but it can add some dimension to an image. The lovely floral image for this lesson was fun to color. As you can see on my practice sheet below, I used various colors on the flowers. For the top two images, I envisioned my light source was coming from the top left, trying to keep the lighter color on the left side. On the bottom two flowers, I decided that the light was beaming straight onto the flowers. Also, to color the petals, I used a flicking technique as shown in the lesson, to add the appearance of texture. The lighting and shading concept is something that will definitely take some practice but as long as the image looks good to you, there's no need to stress over it. Have fun coloring!

Online Card Classes practice day 3
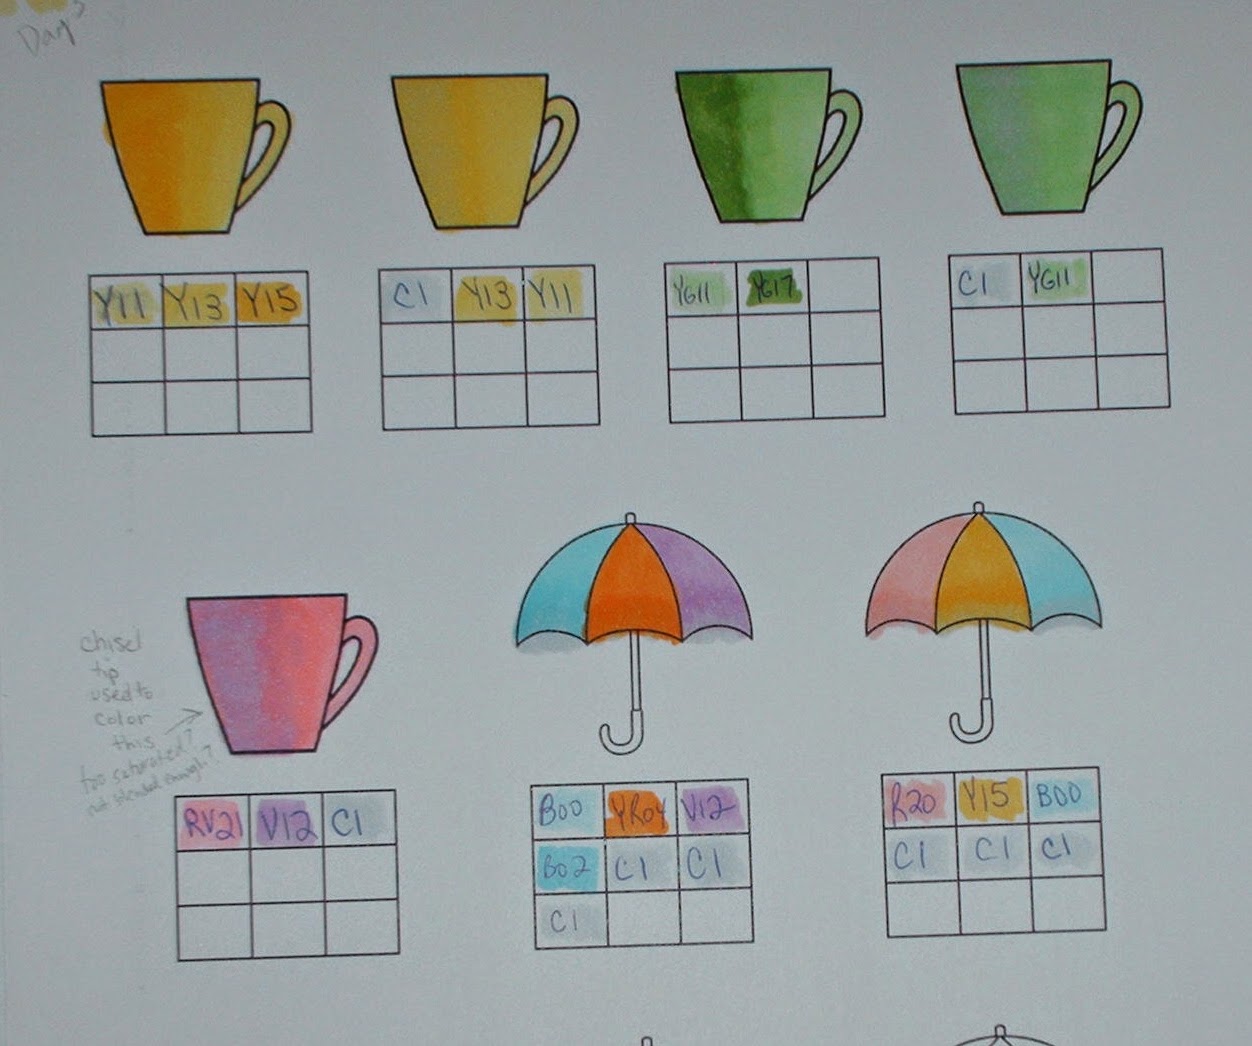
For day 3 of the Online Card Classes Copic Markers for Card Makers,
the lesson was about shading with a gray marker. I only have a C1 marker so the technique worked good for me when I used one light color to shade with it. This is shown on the second umbrella on my practice
sheet in which I used R20, Y15 and B00.
Online Card Classes day 2 practice
For day 2 of the Online Card Classes Copic Markers for Card Makers, the lesson was about blending. The techniques were tip-to-tip blending, acetate blending and feathering trick. I used the tip-to-tip on the birds, the feathering on the blue and purple/orange butterfly and the acetate technique on the pink/red butterfly. Here is my practice sheet incorporating these techniques.

Monday, September 22, 2014
Online Card Classes: Copic Markers for Card Making
A few weeks ago I signed up for the Online Card Classes Copic Markers for Card Makers and today was the first day of class! This class is being taught by Kristina Werner, Jennifer McGuire and Sandy Allnock along with a few other crafty guests. I did purchase a few Copics in the past but recently jumped on the bandwagon and started buying more so this class came at a great time! Today's lesson was to practice two and three color blending. I didn't have the recommended paper suggested to use with Copics (waiting for my supply order) so I used a paper by Crafter's Companion which is meant for alcohol based markers. Here's my sample coloring; not bad but that's why I'm taking the class, LOL!
 .
.
Saturday, September 20, 2014
Birthday card
I haven't been stamping much this year but I did manage to make a few cards for some birthdays. I was clearing out some images on my camera and came across this card that I made back in May. The floral image is from JustRite's The Greatest Joy Stamp set and the happy birthday greeting is a Hero Arts Decorate It! message stamp. The interior sentiment is from My Favorite Things' Die-namics Polka Dot Greetings set.


Monday, March 24, 2014
Batman Envelope Pillow Cover
Here is the latest sewing project that I made yesterday. This is right on time for me to link up and participate in Ashley's "You Made It and Love It" link party at her blog Make It and Love It. This is the second envelope style pillow cover I've made as they are so fun and quick to sew. As with my first one, I again followed the instructions by TheCraftyGemini on Youtube. I went shopping on Saturday and purchased the Batman fabric and a 18" Soft n Crafty Classic Comfort Everyday Design pillow form at Joann's. I was looking for a 14" or 16" pillow form but was only able to find a 18" so I went with that size. I only bought a yard of fabric thinking hoping :0 it was enough but with that size pillow form, the fabric was a bit short. If it wasn't a directional print, and the pillow form was 14" it would have been fine but I did want Batman to be face up, LOL! I checked my fabric stash and found the perfect blue fabric to complement the Batman fabric but I needed the front panel to measure 19"x19". To make up for the shortage, I cut the front panel to 16x16 and added 1.75" strips (including 1/4" seam allowance) of the blue fabric to all four sides. I didn't measure the strips correctly at first because I had it all worked out in my head. (oh yes, I can remember all this math and fractions, duh--math--my worst subject in school, oops, LOL) But, of course I forgot and luckily my memory kicked in and I measured the first strip, halfway sewn, and still under the needle! So I ripped it out, cut 4 more strips correctly and finished up the front panel. A few more seams and finally the cover was complete!
 | |
| front view |
 | |
| back view |
 |
| front view without pillow form |
Saturday, February 1, 2014
A new year and a quilt from 2013
Wow, it's the first of February and this year seems to be going fast already. I haven't been crafting as much as I'd like lately but I did manage to finish my first quilt a few months ago! This was such a long process mainly because I worked on it intermittently over the last 5-6 months but it was worth it! I didn't create it with much overhang but enough to cover the top of a twin size bed. It's my first quilt and with very limited crafting space, I made it a size comfortable enough for me to handle. I had some left over Teenage Mutant Ninja Turtles (TMNT) fabric from a pillow I made for my son several years ago. I thought a quilt would be a great use of this leftover fabric plus I've been wanting to make a quilt for a while now. I did have to buy additional fabric to complement the colors in the TMNT fabric and I think it worked out fine. And as I've read and heard from other quilters online, there is no quilt police! You have creative freedom to make it your own! I had to keep telling myself this to keep my nerves at bay and to keep from getting discouraged, when some of the seams didn't exactly line up, as well as reminding myself that it's my first quilt! Woo, but I got through it of course, LOL! I used my basic sewing machine (a Kenmore) and my dining room table! I created a scrappy binding from strips of the various leftover fabrics. And the backing? Oh my that was a challenge but I found a video on YouTube titled Backing.wmv by sewandquilt. I am so glad that popped up in my search because it was the visual instruction I needed. It helped me a great deal! Also, one thing I would do differently is to mark the quilting lines before quilting. I thought I could wing it and keep the lines straight but at one point, I was getting crooked so I tried doing a wavy design but that wasn't working so I went back to a straight line in the middle of stitching; oops, LOL! Hey, it's the thought and love that goes into making it that counts, right? LOL! Well, here are a few pictures. Have a nice day!


Tuesday, November 12, 2013
A few cards and gift card holder
Here's a few cards and an envelope gift card holder that I made over the past several months for various family members that I'm now getting a chance to share.
 | |
| Floral images-Gina K Designs Elegant Flowers stamp set; sentiment-MFT Stamps Time for the Bubbly stamp set |
 |
| Paper Pieced cupcake liner and Stickles added for some sparkle; stamped images-MFT Stamps It's a Cupcake Kind of Day stamp set |
 | |
| Floral image-Just Rite's The Greatest Joy stamp set; sentiment-Hero Arts Decorate it stamp set |
 |
| I needed a quick way to present a gift card to my son--I followed this video here: http://dawnsstampingthoughts.typepad.com/dawns_stampin_studio/2013/08/envelope-gift-card-holder-video-.html |
Thursday, May 16, 2013
Celebrate

Sunday, May 12, 2013
Happy Mother's Day
Happy Mother's Day to all the Moms including mine!
The hydrangea image on this card is a stamp image from Rubber Stampede. I stamped it onto watercolor paper and embossed with gold embossing powder. I colored it in with some Marvy LePlume markers and finished it off with a ribbon bow. The word "Mom" is an image from the Gina K. Designs stamp set called Lovely Shelf. The completed image was cut and also matted using a few Spellbinders Labels Eight nestabilities die.

The hydrangea image on this card is a stamp image from Rubber Stampede. I stamped it onto watercolor paper and embossed with gold embossing powder. I colored it in with some Marvy LePlume markers and finished it off with a ribbon bow. The word "Mom" is an image from the Gina K. Designs stamp set called Lovely Shelf. The completed image was cut and also matted using a few Spellbinders Labels Eight nestabilities die.

Saturday, April 27, 2013
Sweet Birthday
My second card of the year! I finally got some mojo to create this card for my cousin! The cupcake image is from MFT's "It's a Cupcake Kind of Day"
stamp set and the sentiment is from GKD's 100% Sweet stamp set. I paper pieced the cupcake liner with KI Memories pp. I
colored the cupcake using Marvy LePlume II marker #85 (mocha) and
American Crafts Chromatix markers (Rouge #1) and (Rouge #2). I used Spellbinders' nestabilities dies to cut the plain and scalloped circle (My Mind's Eye pink pp adhered to a piece of card stock for thickness). I added a Prima flower and a Making Memories brad for a bit of embellishment. I added
sparkle to the cherry and the paper using Stickles glue "Icicle". I finished the
interior with more of My Mind's Eye and KI pp and a sentiment from Fiskars' "Birthday Cheer" stamp
set.


Saturday, January 12, 2013
Happy New Year
Happy New Year!
 For my first card of the year, I used the MFT Wednesday sketch #105. The main image is from MFT's a la modes Big Birthday Wishes stamp set. I colored it with Prismacolor pencils and gamsol. I've tried this coloring technique a couple of times before so I'm still practicing but I really like how the gamsol really smooths out the pencil strokes. The sentiment is a $1 stamp by Studio G that I purchased from Michaels sometime last year. I really like how bold it is and it's size fit perfectly with the image. The card base is cut to 6" x 5 1/2". I used Stampin Up's night of navy and real red card stock, and the patterned paper is by My Mind's Eye.

Tuesday, December 25, 2012


Thursday, November 8, 2012
Happy Birthday
I made this birthday card last night and mailed it off to my aunt this morning. A few days ago I was looking through some of my older craft magazines to get an idea for a layout. Ever have an idea in mind but the project turns out a bit different? :) It's not much different so I'm happy with how it turned out!
 Supplies: JustRite stamps (2" floral center from 15 pt round wood stamper set and sentiment from Topsy Turvy Cakes stamp set ); VersaFine ink (vintage sepia); Papertrey Ink card stock (scarlet jewel, ripe avocado & vintage cream); patterned paper (My Mind's Eye); Spellbinders circle nestabilities; EK Success double scallop edge punch; Basic Grey button; DMC floss; Morex ribbon; Marvy scallop circle punch; Prismacolor pencils

Cookie bars- Yum!
I have a sweet tooth and when I have a craving for something warm and sweet to sink my teeth into, usually on a Friday night, I opt to make some cookie bars. After a long week of work, this quick, no fuss treat can satisfy the craving! I took this recipe and tailored it to my own liking and boy do I like them including my son! Why not cookies instead? Well, I do like cookies but, 4-5 ingredients (butter, graham crackers crumbs, sweetened condensed milk, chocolate chips and sometimes a bit of peanut butter chips) about 20-25 minutes of baking (depending on your oven) and they're ready! Mmm, so delicious!


Subscribe to:
Posts (Atom)